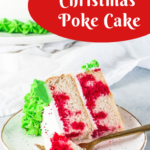
Christmas poke cake is a festive and easy Christmas dessert. Soft cake layers, creamy vanilla frosting, and lots of sprinkles make it a welcome addition to your holiday parties!
This post contains affiliate links. If you make a purchase using one of those links I may receive a small commission, at no additional cost to you. I only link to products I use myself. For the full disclosure,see here.
It’s the most wonderful time of the year! And by that I mean, of course, time to bake super festive, super fun desserts!
Case in point: this Christmas poke cake. If it doesn’t just call out to be devoured by the Christmas tree alongside a big cup of eggnog (and some cookies too, if you’re like me) then I don’t know what does.
The best part? It’s really not complicated to make—even if you’re not much of a baker or cake decorator I really think you can do this.
Why you’ll love this Christmas poke cake:
- It’s easy to make
- No stand mixer required!
- It’s easy to divide the work up over a couple of days
How to make Christmas poke cake
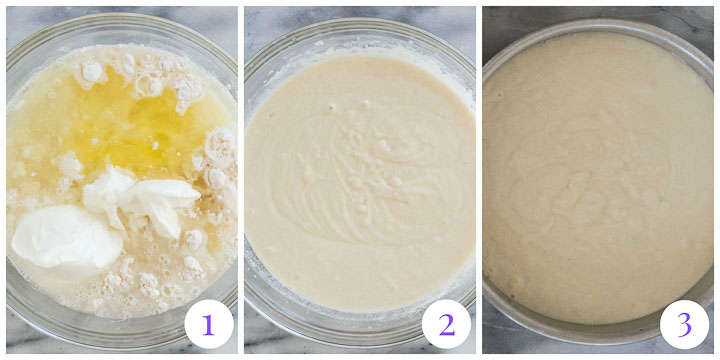
- Combine your cake ingredients—except jello—in a bowl
- Beat until smooth
- Pour into 8-inch cake pans and bake about 45 minutes
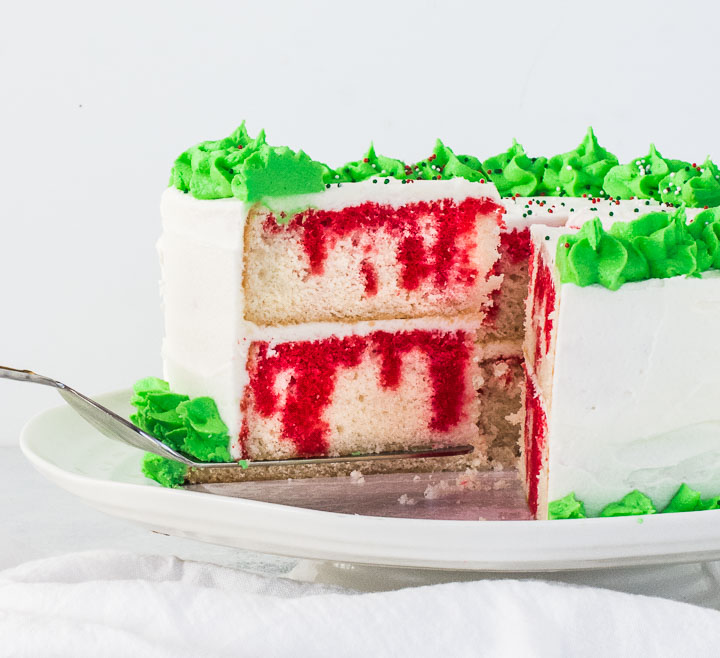
Then you’ll cool your cake layers completely.
If they’ve domed, I recommend using a long serrated knife to trim then so they’re even—this way your cake layers will stack neatly. You can see in the pics below that I’ve trimmed the tops off of the layers.

Once your layers are cool (and trimmed if desired):
- Mix jello and boiling water until the jello dissolves
- Use a fork with long tines (or a toothpick) to poke holes all over the cake layers
- Pour the jello over that
Baker’s tip: Before adding the jello, put the cake layers on a wire rack and set the wire rack on a rimmed baking sheet. That will catch any jello you spill.
Chill your cake layers for at least four hours, or overnight.
Notes:
- I used raspberry jello but you can use any red jello—or green jello!
- If you use a toothpick rather than a long-tined fork, swirl the toothpick around a little bit to enlarge the holes. You don’t want craters but you want the holes a little bigger than the width of a toothpick.
- If you have a favorite from-scratch white cake you can use this same technique with the jello; it works best with cake layers that are fairly firm so the jello doesn’t all run to the bottom of the cake.
How to make vanilla buttercream frosting

- Beat room temperature butter until smooth
- Add powdered sugar and a few other ingredients
- Beat until smooth and fluffy
I recommend using clear vanilla extract in this frosting so your frosting stays white but that’s totally up to you.
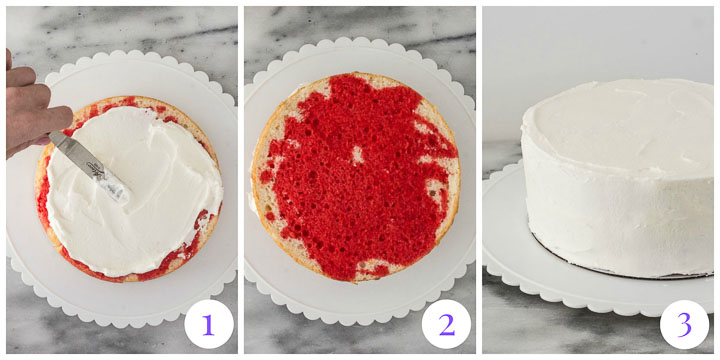
- Spread an even layer of frosting over one cake layer
- Top with the second cake layer
- Frost with the remaining frosting
If you want, you can reserve a little frosting, dye it green, and pipe that around the cake. For instructions on how to do this, see below. I used this leaf green gel food coloring.
How to use a piping bag

- Fit your selected frosting tip into your bag (see the notes below for the tip and bag I used)
- Fold the top half of the bag down
- Use a rubber spatula to scrape your frosting into the bag and twist the top to prevent it from oozing out
- Squeeze the bag lightly and press the tip to the cake wherever you want the frosting to go. Release the bag, pull it away, and voila, you’ve added decoration!
Baker’s tip: If you’re new to piping frosting, practice your piping on a piece of wax paper before trying it on the cake. You can scrape any frosting on the paper right back into your piping bag. I cannot emphasize enough how helpful this is!
Notes on decorating your cake:
- I used this Ateco piping tip (#824) and a 16-inch Wilton piping bag
- If your piping bag is brand new, you’ll need to cut a bit off of the bottom for the tip to fit
- If you use the same size tip I used, it’s large enough that you can use it without a coupler fitted into the bag (smaller tips typically require couplers)
- A turntable makes frosting and decorating cakes so much easier–you can turn the cake rather than having to move yourself around the cake. I’ve had the turntable you see in the pics above since high school and it doesn’t seem to be available anymore. This turntable is a great alternative.
- I used this green gel food coloring for my green frosting
Can I make this cake ahead?
You sure can! Unfrosted cake layers can be stored in the fridge (loosely covered) overnight.
You can also make the frosting ahead. Cover the bowl of frosting with plastic wrap and store it in the fridge for up to a day.
When you’re ready to use the frosting, beat it with an electric mixer on medium until it warms up enough to use. (You may need to add a little bit of milk or cream to thin it out but I don’t usually find that necessary.)
The cake, once frosted, can be stored at cool room temperature (basically don’t store it in a hot kitchen but it doesn’t have to be refrigerated), loosely covered for a day or so.
How to store your Christmas cake
Uneaten cake can be stored in the fridge, covered, for about 3 days. You can also freeze individual slices, wrapped tightly in plastic wrap and/or freezer paper, for up to 3 months.
A few more recipes you might enjoy
No Bake Eggnog Cheesecake
Funfetti Christmas Cake
Gingerbread Loaf Cake
Fireball Cake
White Chocolate Eggnog Cake

Did you make this Christmas poke cake? Yay! Let me know what you think with a comment and a rating below. Then post a pic on Insta–tag @theitsybitsykitchen so I can see your delicious creations!

Christmas poke cake is a fun and festive dessert made simple with a doctored cake mix. It's a delicious addition to holiday parties!
- 1 15.25-ounce box white cake mix*
- 1 cup all-purpose flour
- 1 cup granulated sugar
- 1 cup full-fat sour cream
- 1 cup water
- 1/2 cup vegetable oil
- 4 large egg whites
- 2 teaspoons vanilla extract use clear if you have it
- 1 3-ounce box raspberry jello**
- 2/3 cup boiling water
- 1 1/4 cups unsalted butter at room temperature
- 4 1/2 to 5 cups powdered sugar
- 5 to 8 tablespoons milk or heavy cream
- 1 tablespoon vanilla extract use clear if you have it
- 1/2 teaspoon salt
- green gel food coloring optional
- Preheat the oven to 350 degrees. Spray 2 (8-inch) round cake pans with cooking spray. (Be sure your pans are at least 2 inches tall, because the cake layers rise quite a bit.) Line the bottom of the pans with parchment paper, then spray the paper with cooking spray.
- Combine the cake mix, flour, sugar, sour cream, water, vegetable oil, egg whites, and vanilla extract in a large mixing bowl.
- Beat with an electric mixer on medium speed for 2 minutes—the batter should be very smooth. Use a rubber spatula to scrape up from the bottom and get everything totally mixed together.
- Divide cake batter between the prepared pans and bake cake layers 43 to 48 minutes, until a cake tester inserted into the center of the cakes comes out clean.
- Cool cake layers in the pans for 20 minutes, then carefully transfer to a wire rack to cool completely.
- Once the cake layers are fully cooled, use a long serrated knife to trim them if they’ve domed.
- Use a fork with large tines to poke holes in the cake every half inch or so; try not to go all the way to the bottom of the cake. (If you don’t have a large-tined fork, you can use a toothpick but you'll want to swirl the toothpick around a bit to enlarge some of the holes.)
- Combine the jello and boiling water in a small bowl and stir until the jello dissolves. Set aside to cool for 5 minutes.
- Pour half of the jello over each cake layer. (To avoid a mess on your counters, set the cakes on a wire rack and set the wire rack over a large baking sheet. That should contain any spilled jello.)
- Refrigerate the cake layers for at least 4 hours. You can also refrigerate them overnight, but you should cover them loosely with plastic wrap if you do.
- Place the butter in a large mixing bowl and beat until very smooth.
- Add 4 1/2 cups of the powdered sugar, 5 tablespoons of the milk, and the vanilla and salt. Beat on low to combine.
- Turn mixer to medium and beat until frosting is very smooth.
- If frosting is too thin, add additional powdered sugar; it it’s too thick add additional milk.
- Set one chilled cake layer on a cake stand or cardboard cake circle. Spread a thick layer of frosting over the cake and top with the second layer.
- Frost with the remaining frosting and decorate as desired.
- (I reserved some of the frosting, dyed it green, and piped it around the edge of the cake. See the body of this post for details if you want.)
- Serve. Uneaten cake can be stored loosely covered in the fridge for up to 3 days or in the freezer (tightly wrapped) for up to 3 months.
- *I used Betty Crocker Super Moist white cake
- **You can substitute any flavor red jello (or even green jello)
Bonnie says
I made this cake for a Memorial Day cookout. Everyone loved it. I made one layer with a blue jello and one layer with red jello. It was a fun and delicious cake.
Kelsie says
I love that idea! I’m going to have to try it for the Fourth. Thanks so much for letting me know!
David @ Spiced says
Dude, this cake screams Christmas! I love it. In fact, this cake makes me want to curl up in my Snoopy pajamas and watch Elf. I’ll have a plate with this cake in one hand and a glass with eggnog in the other. Can we just make that happen??
Kelly | Foodtasia says
Kelsie, such a fun and colorful cake! The jello must give it incredible flavor! Yay for holiday baking!
Ben|Havocinthekitchen says
I see you’ve opened the festive season Kelsie, and that’s great (I’m going to join you very soon) This cake looks beautiful, so Christmasy. Indeed, I’ve never made a poke cake, so probably it’s time to give it a shot (I clearly see cranberry jello in my version…or maybe the combination of red (berry) and green (mint) flavours. Thanks for the inspiration!
Katherine | Love In My Oven says
Etienne always asks for poke cake, because he loves how moist they are! I know my kids would light up at the sight of this festive cake!! Definitely pinning this one for a potential Christmas day dessert. It’s so pretty!
Carlee says
What a fun and festive cake! It’s perfect for a holiday party for sure!
Leanne says
If there was ever a dessert that was perfect for Christmas Day, it’s this one Kelsie! So bright, colourful and delicious looking! You’ve got me feeling all festive now!
annie@ciaochowbambina says
So very festive! How do you continue to come up with simple yet perfect desserts?! This one’s a keeper! (But aren’t they all?!!!! Yes!)
Cheyanne says
How festive and fun is this cake!?!?!?! Not to mention it looks absolutely delicious!! And, I mean, who doesn’t love a cake that’s easy to make!?! This is just perfect for the holidays and all the parties!
Kelly @ Kelly Lynn’s Sweets and Treats says
This is the perfect Christmas cake!! I love how easy it is to make by using a box mix. It is definitely a show stopper when you slice into it and see that red!!
Mary Ann | The Beach House Kitchen says
I’ve never made a poke cake Kelsie, but clearly I need to change that because this one looks totally delish and incredibly festive! I spent the last three days making Christmas cookies in my kitchen! It’s time to move on to cake! Well done, as usual!! Pinned!
Kim Lange says
Kelsie I love how festive this cake is! It’s definitely Christmas -worthy with all the red marbling and green frosting and it’s so pretty! I love poke cakes! Pinning! xo
Dawn - Girl Heart Food says
I’m definitely not much of a cake decorator, but I think I definitely could pull this one off 🙂 Looks super festive, Kelsie and I bet it would disappear in a flash if I brought to a holiday party! Pinned! Happy weekend ahead, my friend!
Alexandra @ It's Not Complicated Recipes says
This is such a fun and festive celebration cake – so clever! 🙂