
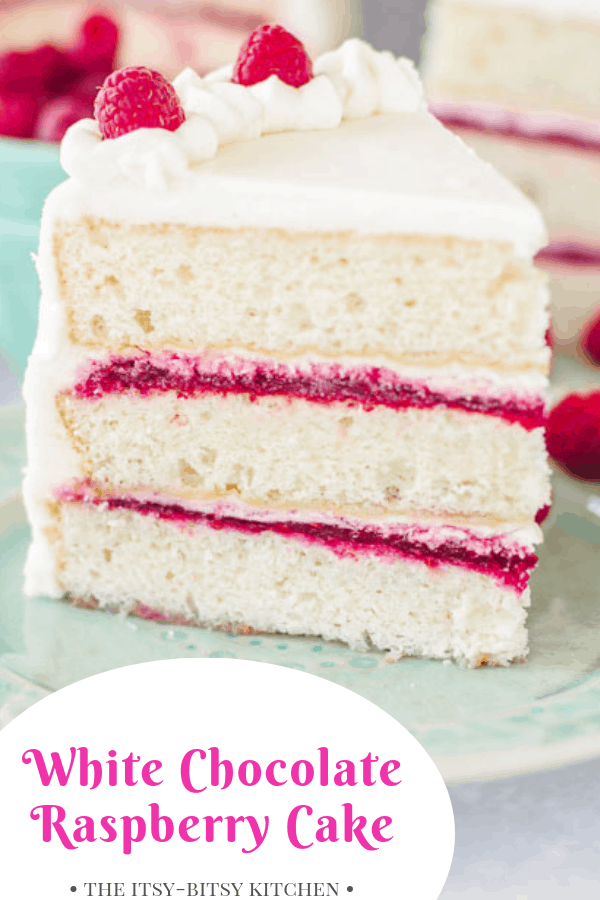
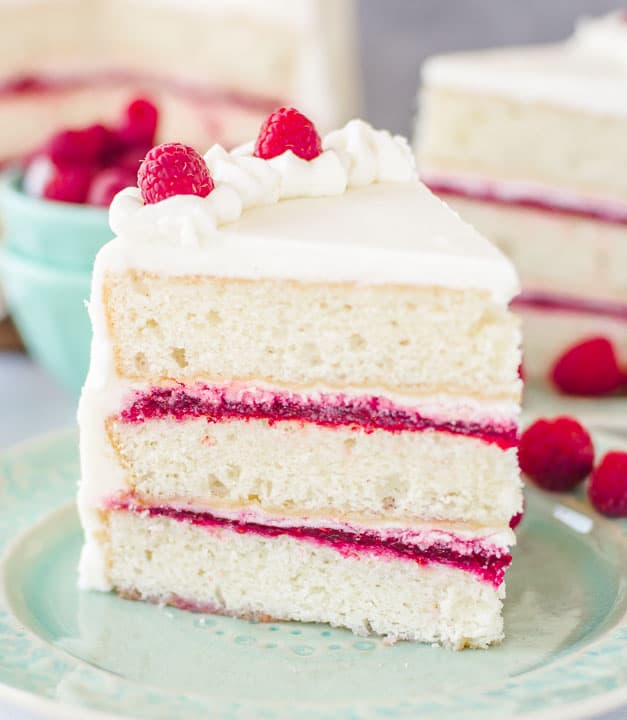
This white chocolate raspberry cake features sweet white chocolate cake layers, a tart raspberry filling, and plenty of white chocolate buttercream. Just try to stop at one slice!


This post contains affiliate links. If you make a purchase using one of those links I may receive a small commission, at no additional cost to you. I only link to products I love and use myself. For the full disclosure,see here.
Hey guys! Are you ready for some delicious, delicious cake? I know I am! It’s been, like, weeks (!!) since my last layer cake post and I’m going into withdrawals. Cake DTs are really unpleasant.
Do you love making layer cakes like I do? I know they can be sort of a pain what with baking the layers, filling the layers, frosting the layers. . .but nothing is quite as satisfying as slicing into a layer cake.
Except, obviously, for taking that first bite of your gorgeously filled and frosted cake.
And never was that more true than when I took a bite of this white chocolate cake with RASPBERRY FILLING! That little pop of tart berry is so perfect when paired with the creamy sweetness of the white chocolate.
It’s totally swoon-worthy.
And hey, guess what? The filling is made with frozen raspberries so this cake is totally do-able year-round. (I love that!) I’m thinking this would be a pretty great holiday cake because of the bright pop of red.
I’m sorry to bring up the h-word but I like to plan menus way ahead of time. Remember Bree on Desperate Housewives, doing a Christmas dry run? She was channeling me. (At least I think that happened on Desperate Housewives and not just in my actual life.)
White chocolate raspberry cake: the process
The white chocolate cake layers are simple to make because we use a box mix doctored up with sour cream and pudding. I used white chocolate pudding but you can substitute vanilla or cheesecake—just as long as it’s white-ish—if you don’t have white chocolate pudding on hand.
Baker’s tip: be sure you use instant pudding mix, NOT cook and serve. I’ve used both Godiva and Jell-o pudding in this cake and preferred Godiva, but use whichever you like.
Start by melting your white chocolate and butter together in the microwave at 50% power in 15-second intervals, stirring after each interval.
Melting white chocolate slowly is important so it doesn’t scorch; I thought I got a picture of this process but apparently not. I’m sorry!

- Next, combine your cake mix (I used Duncan Hines) along with the pudding mix, milk, egg whites, sour cream, a little vanilla, and salt.
- Beat all of that with an electric mixer for 2 minutes. The batter will be very thick. Add the white chocolate-butter mixture and beat again until fully incorporated.

Divide the batter between three 8-inch round cake pans and smooth the top with an offset spatula. Because the batter is thick, it will not spread on its own so spreading it out is necessary.
Bake for about 25 minutes, then cool the cake layers in the pans for 20 minutes and carefully invert them onto a wire rack to cool completely. The cake layers will turn out to be slightly concave in the center, as in the second picture above. This is fine.
If the concavity bothers you, you can use a long serrated knife to trim off the tops and even them out. If you go that route, chill the cake layers in the fridge until they’re cold enough to cut through. The cake is very soft and if you try to trim the layers without chilling them, they’ll crumble.
The filling is just a matter of boiling the frozen raspberries with sugar, lemon juice, and cornstarch until the berries are thick and spreadable.
Be sure when you fill and frost your cake that you don’t spread the jam all the way to the edge (see last picture above); this prevents jam from getting in your frosting.
If you wanted to substitute store-bought raspberry jam, I think that would be just fine.
After you make your filling, frost the cake with a simple white chocolate buttercream and you’re ready to eat! I won’t tell you to have dinner first. . .because, I confess, I had a slice of white chocolate raspberry cake for dinner the day I did these photos.
It was the best dinner I had all week 🙂
How to store your white chocolate raspberry cake
Should you happen to have uneaten cake you can store it, covered, at room temp for a couple of days.
If you can’t eat all the leftovers in two days, this cake freezes well.
Slice the cake, set the slices on a baking sheet, then pop the baking sheet in the freezer for about half an hour to set the buttercream.
Once the frosting has hardened, tightly wrap each slice individually with a few layers of plastic wrap and/or freezer paper. You can store it this way for a couple of months.
A few more layer cakes (in case you’re hungry)
Strawberry Layer Cake
Tuxedo Cake
Death by Chocolate Cake
Coconut Mango Cake
If you make this white chocolate raspberry cake–or any of my recipes–be sure to let me know what you think by leaving a comment and rating below. And post a pic on Insta too—tag @theitsybitsykitchen so I can see!

- 6 ounces white chocolate finely chopped
- 10 tablespoons unsalted butter cut into chunks
- 1 15.25-ounce box white cake mix*
- 1 3-ounce box instant white chocolate pudding mix**
- 1/2 cup whole milk at room temperature
- 1/2 cup full-fat sour cream at room temperature
- 4 large egg whites at room temperature
- 1/2 teaspoon vanilla extract
- 1/8 teaspoon salt
- 2 cups frozen raspberries
- 1/4 cup granulated sugar
- 2 tablespoons fresh lemon juice
- 2 tablespoons cornstarch
- 4 ounces white chocolate finely chopped
- 1 1/2 cups unsalted butter at room temperature
- 5 1/2 to 6 1/2 cups powdered sugar
- 4 to 6 tablespoons whole milk or heavy cream
- 2 teaspoons vanilla extract
- 1/4 teaspoon salt
- fresh raspberries for garnish
- Preheat the oven to 350 degrees. Spray 3 8-inch round cake pans with cooking spray and line the bottoms with parchment paper. Spray the paper with cooking spray and set pans aside.
Place the white chocolate and the butter in a microwave-safe bowl and heat on 50% powder in 15-second intervals, stirring after each interval, until chocolate is melted and mixture is smooth. Combine the remaining ingredients in a large mixing bowl and beat with an electric mixer set to medium for 2 minutes. Beat in the white chocolate until combined. Divide batter evenly between prepared cake pans and smooth with a spatula.
- Bake 24 to 28 minutes, until a cake tester inserted into the center of the cake comes out clean. Cool in pans for 20 minutes, then carefully invert onto a wire rack to cool completely before filling and frosting.
- While cake is in the oven, combine all filling ingredients in a small saucepan set over medium heat. Bring to a simmer, stirring constantly, and simmer until mixture is very thick and clings to a wooden spoon. Scrape into a small bowl and refrigerate until cool enough to spread.
- Place the chocolate in a microwave-safe bowl and heat at 50% power in 15-second intervals, stirring after each interval, until chocolate is melted and smooth. Set aside to cool for 5 minutes.
- Beat the butter in a stand mixer fitted with the paddle attachment until light and creamy, about 30 seconds. Turn mixer to low and beat in 5 1/2 cups of the powdered sugar, 4 tablespoons of the milk, and the vanilla and salt until combined. Add the cooled white chocolate and mix on low until incorporated. Turn mixer to medium and mix until smooth. If frosting is too thick, add additional milk; if it’s too thin, add additional powdered sugar.
- Assembly:
If your cake layers are too concave for your liking, chill the cake layers, then even them out with a long serrated knife.
Place one cake layer on a cake stand or cardboard cake circle. Spread half of the raspberry filling over the top of the cake (don’t go all the way to the edge). Gently spread (or pipe) a layer of frosting over the top of the filling, this time going all the way to the edge. Repeat with remaining filling and another layer of frosting. Top with remaining cake layer.
- Frost your cake with remaining frosting and decorate as desired. Serve.
*I used Duncan Hines
**You can substitute cheesecake or vanilla pudding--just be sure that it's instant.
Filling adapted from Genius Kitchen
Debra C says
Can’t you replace the white Duncan Hines Cake mix for a gluten free white cake mix In this recipe?
Kelsie says
I haven’t tried that so I don’t know how to advise you but I would assume it will work if it’s the same size as the Duncan Hines mix.
Joanne Cisneros says
Thank you for mentioning how thick the batter is. I would have thought i had done something wrong. It’s incredibly thick. It was beautiful and tasted great. My husband’s new favorite.
Kelsie says
I’m glad it was a hit!
Tammy says
There is nothing to say except MOUTHWATERING
This is MY birthday Christmas and all special occasions dessert
Nothing but fabulous and tomorrow I’m going to try it with fresh cherries
Kelsie says
I’m so glad you love it!
Charlena says
I have been making this cake for 2-3 years now. It is my go to cake for birthdays and special events. Sometimes I switch it up and add different fillings as well as fresh vanilla beans to the cake mix and frosting. It’s delicious every single time and is always requested and talked about. If I show up to a gathering without the cake people are disappointed. Definitely a favorite. Thank you so much!
Kelsie says
You’ve made my day, Charlena!
Jenn says
Is it possible to adjust this for a 3 layer 6 inch cake instead? Does it change the ingredient quantities or baking time? TY!
Kelsie says
I would just bake any extra batter into cupcakes rather than trying to adjust the recipe. The layers will probably need more time in the oven since (I assume) your 6-inch cake pans will be deeper than my 8-inch ones.
Heaven Chartrand says
I made this cake for my daughter’s 19th birthday after her request for a white chocolate raspberry birthday cake. I looked around for one to order and had no luck so I thought I would try. It turned out amazing!! I should have flipped the cakes back over after flipping them out of their pans, but other than that just perfect! I wish I could leave a picture on here to show how cute it looks also!
Kelsie says
I wish you could post a pic too! I’d love to see it!
Bernie says
If I don’t have three cake pans and only two, Would this cake be ok if I just did two layers with the rasberry filling inbetween the two layers? Thanks!
Kelsie says
You can do that but you’ll need to increase the baking time. You can also just bake the cake layers in batches.
Maggie says
Is it okay to make the cake layers a week ahead of time and freeze them until you’re ready to add the filling and frosting? If so, what is the best way to wrap the cake layers, with Saran wrap and freezer bags?
Kelsie says
Yep! Just be sure to cool them completely first. I like to use two layers of Saran Wrap and a layer of foil over that.
Terry says
I’ve made this several times and everytme it got rave reviews. Can be decorated for any occasion.
Ellie says
How does it do stored in the fridge?
I want to make this in advance but my house is very warm and I’m worried about the frosting slopping off if it’s sitting on the counter.
Kelsie says
You should be able to store it in the fridge overnight without a problem; storing it at room temp in a hot kitchen would definitely melt the frosting. I’ve been there! I’d let it sit for a bit at room temperature before serving though. I think the cake tastes better when it’s not right out of the fridge.
Ellie says
What kind of white chocolate did you use? Would great value white chocolate chips work? Or do I need something more high quality?
Kelsie says
Use something like Ghirardelli or Baker’s white chocolate. (I used Ghirardelli.) Chocolate chips don’t melt very well so they aren’t a good option here.
Sophie Dixie says
Do I need to alter any ingredients if I don’t put the butter and white chocolate in the batter ?
Kelsie says
I think the cake would be fine if you omit the white chocolate but you can’t omit the butter–the cake will be very dry.
Valerie Beale says
Cake was delicious! Used cheesecake pudding as I could not find white chocolate. Only had one 8″ cake pan but had an 8″ foil pan (the cheap kind you buy in the grocery store with a clear lid). I was hesitant to use it but it came out perfect. After spraying and parchment and spraying again, the cake easily came out of the pan in perfect shape. Cooked the third layer once I had a free pan. Next time, and yes, there will be a next time since everyone ate 2 pieces, I’ll buy a few foil pans to have on hand. Thank you for making my daughter’s 21st birthday cake a memorable one.
Kelsie says
I’m so glad you enjoyed it!
Candace says
Can I sub strawberry jam instead of the raspberry?
Kelsie says
You can definitely use strawberry jam instead of the raspberry filling. Enjoy!
Anne says
This is the best cake I’ve ever made. Perfect blend of sweet and tart, great crumb, so moist. Just delicious.
Kelsie says
I’m so glad you enjoyed it!
Chris Burch says
Omagosh! I made this for a gathering and had a pastry chef say it was the best White Chocolate Raspberry cake she ever had! I didn’t tell her it started with a cake mix. Just smiled and said thank you ;}
Kelsie says
Awww thank you so much for letting me know! That’s a huge compliment 🙂
Becca says
Are the eggs, water, and oil that are stated on the box mix for the cake required or just the ingredients you have listed?
Kelsie says
Hi Becca, just use the ingredients I listed in the recipe. Ignore the ingredients on the box. Enjoy!