
Green velvet cake with cream cheese frosting is simple to make and tons of fun to eat. Whether you’re serving it for a holiday, a birthday, or a regular afternoon, this cake is a hit with everyone who tries it!

This post contains affiliate links. If you make a purchase using one of those links I may receive a small commission, at no additional cost to you. I only link to products I love and use myself. For the full disclosure,see here.
What’s better than regular cake? GREEN VELVET CAKE!
Basically it’s red velvet cake all dressed up for St. Patrick’s Day. (Or Christmas. Or a Teenage Mutant Ninja Turtle birthday party, which I’m pretty sure my brother had once upon a time.)
Soft and fluffy (and simple to make!) cake layers are filled and frosted with a creamy, dreamy cream cheese frosting. Top with sprinkles (or not, you do you) and devour! It’s DELICIOUS!
Why you’ll love this green velvet cake:
- It’s made from scratch but still simple and straightforward to make
- You don’t need a stand mixer to make it!
- You can make the cake layers a day ahead if you want to break the work up a little
How to make green velvet cake
Green velvet cake is only a little more complicated to make than cake from a cake mix—honestly, if you can use a hand mixer and measuring cups you can totally make this cake without a problem.

- Whisk together your dry ingredients and set aside
- Beat together eggs, oil, sugar, and a few other ingredients until smooth
- Slowly mix in the dry ingredients until just incorporated
- Beat in buttermilk until smooth
- Mix in green food coloring
- Divide between three 8-inch round cake pans
Notes:
- If you don’t have buttermilk you can substitute an equal amount of whole milk mixed with 2 teaspoons of white vinegar (or fresh lemon juice)
- There’s a little cocoa powder in the cake batter, which helps deepen the green color but you can omit that if you want
- I used liquid green food coloring but you can use gel if you prefer
- I don’t recommend using 9-inch cake pans because the cake layers will be really thin
- If you want to make the cake layers ahead of time, you can cool them completely, then wrap them tightly in plastic wrap and store them at room temp for up to a day before you frost them
How to finish your cake
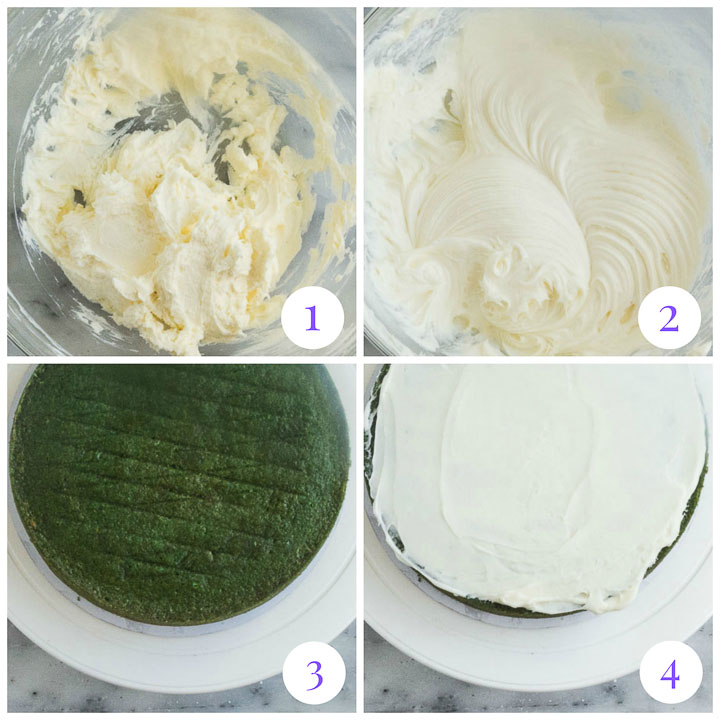
- Beat together room temperature butter and cream cheese
- Beat in powdered sugar, vanilla, and salt
- Set one cake layer on a cake stand or cardboard cake circle
- Spread a layer of cream cheese frosting over that
Then you’ll just repeat this process with the remaining cake layer, frost your cake, then decorate as desired.
To decorate my green velvet cake I used a large open star tip and green nonpareil sprinkles for my green velvet cake.
As always, a cake turntable is SUPER helpful when you’re frosting cakes. Once you use a turntable you won’t go back!
What can I substitute for buttermilk?
As I stated above, don’t worry if you don’t have buttermilk on hand (and you don’t want to buy it). You can substitute an equal amount of whole milk mixed with 2 teaspoons of vinegar or lemon juice.
Stir the two together, then let the sit for 5 minutes and it’s ready to use in your cake layers.
I don’t always recommend substituting for buttermilk when you bake but it works just fine in this green velvet cake recipe!
How to store green velvet cake
If you’re comfortable storing cream cheese frosting at room temperature you can leave uneaten green velvet cake on the counter, covered, for a day or so. (This is how my mom stores cakes frosted with cream cheese frosting but I always refrigerate mine.)
Your cake can also be stored in the fridge (again covered) for up to 3 days or in the freezer, tightly wrapped, for up to 2 months.
When I freeze cake, I always cut it into slices then set the slices on a foil-lined baking sheet and freeze for half an hour or so to set the frosting. Then I wrap the slices in plastic wrap and aluminum foil.
You can eat the slices frozen, defrost them in the fridge overnight, or just zap them in the microwave (UNWRAPPED!) until they’re thawed.
A few more recipes you might enjoy
Fireball Cake
Maple Cupcakes
Fruit Cocktail Cake
Watergate Cake
Red Velvet Cheesecake Cupcakes

Did you make this green velvet cake? Hooray! Let me know what you think with a comment and a rating below. Then post a pic on Insta–tag @theitsybitsykitchen so I can see your delicious creations!

Green velvet cake is a fun and festive dessert perfect for Christmas, St. Patrick's Day, or any day!
- 2 1/2 cups all-purpose flour
- 2 1/2 teaspoons cocoa powder*
- 1 teaspoon baking soda
- 1/2 teaspoon salt
- 1 1/2 cups granulated sugar
- 1 1/2 cups vegetable oil
- 3 eggs
- 1 tablespoon + 1 teaspoon vanilla extract
- 1 teaspoon white vinegar
- 1 cup buttermilk**
- 1 tablespoon green food coloring
- Cream cheese frosting
- 3/4 cup unsalted butter at room temperature
- 8 ounces cream cheese at room temperature
- 2 teaspoons vanilla extract
- 1/4 teaspoon salt
- 4 to 4 1/2 cups powdered sugar
- 1 to 2 tablespoons milk or heavy cream if necessary
- green sprinkles for decorating if desired
- Preheat the oven to 350 degrees. Spray 3 (8-inch) round cake pans with cooking spray. Line the bottom of the pans with parchment, spray the parchment, and set pans aside.
- Stir together the flour, cocoa powder, baking soda, and salt in a small bowl. Set aside.
- Combine the sugar, oil, eggs, vanilla, and vinegar in a large bowl. Beat with an electric mixer set to medium until very smooth, about 2 minutes. Stop to scrape down the sides and bottom of the bowl as necessary.
- With mixer on low, gradually add the dry ingredients and beat until just incorporated. Scrape down the sides and bottom of the bowl.
- Again with mixer on low, beat in the buttermilk, then the food coloring. Use a rubber spatula to mix the batter a few times, taking care to scrape up from the bottom and ensure the flour is totally mixed in.
- Divide the batter evenly between the prepared cake pans and bake 30 to 40 minutes, until a cake tester inserted into the center of the cake comes out clean.
- Set the pans on a wire rack to cool for 20 minutes, then run a knife around the edge of each cake layer. Gently invert each cake layer onto wire racks to cool completely before frosting.
- (Once the cake layers are cool you can wrap them tightly with plastic wrap and store at room temperature for up to a day before frosting.)
- Beat the butter and cream cheese in a medium mixing bowl until smooth.
- Beat in the vanilla and salt. With mixer on low, gradually beat in 4 cups of powdered sugar.
- Once all the sugar is incorporated, turn mixer to medium and beat until the frosting is smooth. If frosting is too thick, beat in a little milk. If it’s too thin, beat in more powdered sugar.
- Use a long serrated knife to trim the cake layers if they’ve domed. Place one cake layer on a cake stand or cardboard cake circle and spread a layer of frosting on top.
- Top with a second cake layer, more frosting, and then the third layer.
- Frost cake with the remaining frosting and decorate as desired. Serve.
- Uneaten cake can be stored, covered, in the fridge for up to 3 days or in the freezer, tightly wrapped, for up to 2 months.
- *You can omit the cocoa powder if desired; it helps deepen the green color of the cake
- **You can substitute 1 cup of whole milk mixed with 2 teaspoons white vinegar or lemon juice. Let the mixture sit for 5 minutes before using.
- I don't recommend baking this cake in three 9-inch cake pans because the layers will be very thin.
Linda Mathieu says
My cake came out a pallid mint green. Perhaps because I used gel color rather than liquid food color? And perhaps you should add to the frosting directions to sift the 10X sugar to avoid lumps. I always do this anyway so was not a problem. Suggestions to achieve the beautiful rich green in the photo would be appreciated. Thank you!
Kelsie says
That could be the issue or it could possibly be the shade of gel that you used. Next time try the liquid color and see if that gives you the shade you’re looking for. And sifting the powdered sugar is always a good idea!
SoCalSan60 says
Made these exactly as written for St Patrick’s Day- but as cupcakes.
Made 24 with enough batter left over to fill a ramekin.
Beautiful crumb and so incredibly moist!
My pan is dark so did it at 325° for 16 minutes
Tasted one still warm and couldn’t really taste the cocoa or the vanilla but they are nicely sweetened, so next time I will increase both or add a different flavoring. The very mild flavor is the only reason for the 4 out of 5 stars.0
Kelsie says
I’m so glad you enjoyed them!
SoCalSan60 says
I wanted to update my review because once the cupcakes cooled and I iced them the next day, they tasted amazing!
This has become my go to recipe for birthday cakes and cupcakes.
I have done blue velvet and a pineapple velvet and I currently have a batch of pink raspberry velvet cupcakes in the oven.
Thank you so much for sharing this recipe!
Everyone who has had it loves how moist and fluffy it is!
Kelsie says
I’m so happy you love the recipe! And now I’m going to be dreaming of a pineapple velvet cake!
Rylan Wickwire says
i loved this recipe, very quick and easy to make. the cake tasted amazing and so did the frosting. i didn’t find that it was too sweet but just perfect! i will definitely be making this again 🙂
Kelsie says
I’m so glad you enjoyed it!
Kristen says
I made this with my daughter for St Patrick’s Day and it was absolutely delicious! The color in our cake didn’t come out as vibrant as the color in the photos but it still tasted amazing! I will be making this again, maybe in another color…
Kelsie says
I’m glad you enjoyed the cake!
Charles says
Made it exactly as instructions indicate. Frosting was tasty. Cake was tasteless. 🙁
Kelsie says
I’m sorry the cake didn’t meet your expectations!
Lashula says
Can this recipe be used in a bundt pan. If so how long should baking time be
Kelsie says
Unfortunately I haven’t tried baking it in a bundt pan so I can’t give you any guidance. I’m sorry!
J-Man says
Could you use this same recipe, divide it in half before adding the food coloring, then make it half red and half green for a two-layer, red-and-green Christmas cake?
Kelsie says
I think that would work really well. You’ll just have to play around with the amount of red food coloring so you don’t end up with pink layers rather than red. It’s a really cute idea and if you try it please send me a pic!
Silvana Diaz says
Can it work for ready made cake mix?
Kelsie says
I honestly don’t know! I’ve dyed cake mixes before (white cake mix, not yellow) so I guess it could. Sorry I can’t be of more help.